When I comb over Pinterest, I always see beautiful laundry rooms.
Like this...


Jealous.
I have always wanted a pretty laundry room.
No idea why really...
all I do is laundry in there.

But, I just want a cute space to do the laundry in, I guess.
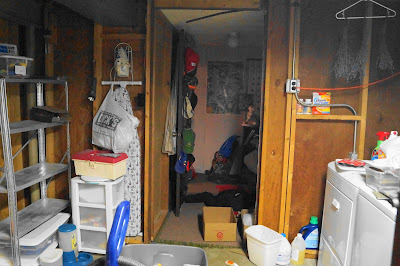
Because...here's what I have now....


It's in the back part of our basement.
With bad lighting.


Granted, these pictures were taken after I started cleaning up.
It normally looks a little better then this. 


I've got concrete walls on one side, the back side of a wood wall on the other.
There are attempts at organization...shelves and bins. But no real system.


This room has become a catch-all room.
See that steam cleaner in the middle of the room.
It's broke. 
Been sitting in that same spot for about two years. 
I know, I know. 


We have the space to make a really cute room here.
Lack of money to do something too fancy holds us back a bit.


I'd love to hear some cost effective ideas from readers on what YOU would do with this room?


But the way...I wore gloves to clean this room.
Gross. It's dirty and dusty in here.


This is my helper Midget. He would love a much nice room for him too!

Here are some pictures of the room after I was finished cleaning...


PLEASE HELP ME!!!!
Share your ideas below.

This is one project that I was so excited about starting.
 
Long before the summer ever start, I was buying cute scrapbook paper to fill an album.


The summer is now over.
All the pictures have been printed.

 
And the paper, stickers, glue and what-nots have all been purchased.

 
Now it's finding the time and energy to finish more then just three pages!!!

 
I get that way with scrap booking.
I am really excited to start out and all the creative juices are flowing.
And that lasts for about 3 hours.
Then I'm done.
 
I was recently invited to an all-day scrap booking lock-in.
I don't think I could do it.
 
Have you done an all day scrap booking event?
How do you stay creative with new and interesting pages for that long?
 
I almost considered going just so I would have access to a Cricuit to use.
I need to get started on this again.
 
I'll make sure and share updates on this book as it comes along!
 
Thanks so much for stopping by today!

It was such a nice day out this past Thursday,
my mom and I hadn't been to garage sales for awhile
because it had been so dang hot out!
 
We didn't find much
We got out there kind of late
and didn't start until after lunch
 
At the first sale, I actually found a lot of free items
the hubby just started nursing school
and they had lots of t-shirts, sweatshirts and hats from his school
all for free!
I loaded up on that!
But I didn't find much else there.
Other then this cute mushroom tealight holder for $1
I have a little gnome garden out back,
so this will look cute in there.
 
 
The second sale was an estate sale.
I normally don't go to those
because here in town,
they are usually really expensive.
 
This one was not and I was able to find these cute Christmas boxes
for $1.00 each!
Aren't they super cute?
 
I'm not sure what I'll do with them yet.
I could use them as gift baskets
 
Or I can remove the signs
turn them on their side
and do something cute with them like this.
 
At the third and final sale we went to
they still had a ton left
but nothing much that was good.
 
I did find this {kind-of} cute Halloween light
It was $1 and I liked it
so it came home with me.
 
Along with some of little misc items I found,
I spent a grand total of $5.75 today
plus my mom bought me lunch at Panera Bread
so all-in-all, it was a pretty good day!
 
What have you found lately?
If you blog about it, leave the post links in the comments!
This craft is most definately different them most that I do
Todays craft is for a grave decoration

My dad passed away a little over a year ago
He's buried in our family plot, only about 10 minutes from my mom and I.

We like to go out there alot
to make sure to grave site is cleaned up
and along with my mom and I, my Grandma and aunts 
that also live near by,
his grave is never without decorations.
(He's buried in a small private cemetery where decorations, planted flowers, ect are all allowed.)

I happen to see this wheat figurine-thing at the Goodwill a couple weeks ago.


Not much to look at
but it was $0.79, so I bought it


While my dad was born and raised on the west coast,
he spent over 30 years of his life in Kansas. 


Kansas grows a lot of wheat as is known as
"The Sunflower State"


So this is what I turned this figurine into
with the help of some new ribbon, a sunflower from the Dollar Tree and a glue gun.


I really like how it turned out!


I like that it's very fall looking
and represents his life in Kansas! 

Thanks so much for stopping by today!
Have a great rest of your day!


We recently found out that a good friend of ours has breast cancer.
She was going to go in to have the lumps removed and have a double mastectomy.
She's a small business owner, a mom, a wife....overall a busy lady!
I love her dearly and hate to see her family going through this.

I know how hard this has been on her and her family,
so I wanted to try and do something to make her day a little brighter.

So I put together this gift basket.

I'm sure you've seen the cost of buying pre-made gift baskets...they are super pricey.
And sometimes buying the items that you'd like to put into a basket can be pretty expensive too.

So I decided to see what items I might already have that would go good in a basket. 


A lot of these are deals that I found for either free or really cheap with coupons:
- Softsoap Bodywash ($0.50)
- Oatmeal bath packets (3 for $0.75)
-Monopoly card game (free)
-Colgate toothpaste (free)
-Sleepytime tea ($2)

The other items, I picked up at garage sales...and were in like new condition:
-Starbucks coffee mug ($1)
- Max Lucado Book ($0.50)
-Basket ($1)
-Avon anti-bacterial lotion ($0.25)

along with some tissue paper I already had, this basket came together nicely!


My total cost for this basket was $6.00


I delivered it to her, and she loved it.
There are a good mix of items to use while at the hospital
and after she gets home.
 
It's important to remember that when giving a gift
cost doesn't matter
the thought and love that go into a present
that's what matters!
 
Thanks so much for stopping by today.
Please take a second to say a prayer for my sweet friend.
 
Have a wonderful week.


I am so excited to share this giveaway with you!
 
My good friend, Mitch Langley, has just released a new CD.


Mitch is super talented and I love his voice!
 
Mitch is a worship pastor in Topeka, Kansas - the father to four of the cutest little boys, and is married to one of my best friends! They have a beautiful family together!
 
 
You can listen to some samples from Mitch's new CD on iTunes
 
 
I personally love all of these songs! If I had to say which was my favorite, I'd have to say "Grace Defines Me" is so beautiful. But I really love all of them!


If you have an Andriod device, you can also download Mitch's songs too!


I told Mitch that I loved this CD soooo much, that I HAD to share it with my readers - so he gave me 4 copies to give to you!!!
 
{Isn't that sweet?}
 
 
Make sure and enter the rafflecopter below to get entered to win one of Mitch's CDs.


Even though I'm working out
trying to lose some weight
and get in shape
 
I still have a horrible sweet tooth
Sometimes there's no fighting it
and it has to be filled.
 
This is my easy solution!
 
 
The WORLDs Easiest
Peanut Butter Double Chocolate Brownies!


You'll start with a cheap-o box of brownie mix
(this one came from Aldi's)
Mix the package according to the box directions.

 
Pour the brownie mix into a prepared pan.
Next you'll need some peanut butter and chocolate chips.

 
With a tablespoon, drop 5-6 dollops of peanut butter all over on the mixture.
Stir slightly with a knife.
Be careful to not touch the bottom or the sides of the pan with your knife.
 
Next add 5-6 more good sizes drops of peanut butter into your pan.
Do not stir this time.
 
Add a layer of chocolate chips on top of the brownie mixture.
Bake according to package directions.


These beauties are the end result.
Yummy
Gooey
Peanut-buttery!!!
 
Can't beat that!
The brownies come out moist and tall!
I love to bit into the swirls of peanut butter...always reminds me of a peanut butter cup!


I love that these treats are easy to whip up for the family
or yourself.
That's how I like to eat them!
 
Thanks so much for stopping by today - have a great weekend!

Last week, I ran my first 5K.
This weekend, I ran my first 10K.

Crazy, I know.

I managed to finish the race in 1 hour and 30 minutes.
Now I know that 15 minute miles are nothing to brag about
but I was still pretty happy about it

At home getting ready to leave
 
The whole race was a jog/walk for me.
I'm really not much of a runner, so jogging suited me just fine
 
The hubby and I ran the race together.
He actually ran the whole thing.
Two years ago, he finished in 50 minutes and was so happy
This year he didn't train and finished in 1:09
I think for a man in his 40's with no training - that's pretty good.
 
Before the race started
 
I felt pretty good during the race.
I would run/jog until it hurt, then stop and walk
 
I even felt good after the race.
I did some errands with my Grandma afterwards
and was doing pretty good

Here we are after we finished!
 
Today.....I am SSSSSSOOOOOO sore.
Surprisingly, it's my rib cage that hurts the most.
 
And I'm meeting with a personal trainer for the first time today also.
Yikes.
 
Anyways, I'm super proud of myself for doing this
The more I do things like this, the more I realize that I can do all kinds of hard stuff..
and sometimes that aren't as hard as I thought they would be.
 
 
I found this video and wanted to share it with you....


Don't you LOVE this?
Make sure and share with all your girlfriends that need to hear it!
 
You can also view the rest of these videos, including a powerful one just for men on YouTube.


I thought it was the funniest thing,
the other day my oldest son Ashton
said he had been in the mood from some my Pumpkin Bread
and could I make some for him.
 
Of course, I can't turn down such a sweet request
so I made up these two beautiful loaves for the boys.
 
 
Both loaves were completely gone
within three days!
 
These kids (and the hubby)
love some pumpkin bread!

 
Here's how you can make some to share with your family too...
 
 
Easy Spicy Pumpkin Bread
 
2 cups all purpose flour
2 teaspoons cinnamon
1 teaspoon pumpkin pie spice
1 teaspoon baking soda
1/4 teaspoon baking powder
1/2 teaspoon salt
1 3/4 cup sugar
1/2 cup applesauce
1/4 cup vegetable oil
3 large eggs
1 1/2 teaspoon vanilla extract
16oz pumpkin puree
 
 
Preheat oven to 350 degrees.
 
Mix together flour, cinnamon, baking soda, baking powder, salt and sugar together until well combined. I used my stand mixer for this.
 
Add to the dry ingredients the applesauce, oil, eggs and vanilla. Mix again until well mixed.
Finally add the pumpkin. Stir in the pumpkin until just combined.
 
Pour into two greased and floured bread pans.
 
Bake for 1 hour 15 minutes.
 
 
*NEW* Printable Version - Easy Spicy Pumpkin Bread


I hope your family enjoys this yummy pumpkin bread as much as mine did!
I'm so excited that fall is here
it's my favorite time of the year!
 
I've already bought our passes to the pumpkin patch
(we have a HUGE one...it's a big deal)
....you can check it out here...
I love everything about fall!
 
Thanks so much for stopping by today!


If you are a wanna-be photographer, a newbie photographer or a pro, you might have heard of Sandy Puc.
 
Sandy offers a whole host of tools to photographers at every level.
 
I was lucky enough to be able to attend one of her workshops last month!


Here is a quick pic of Sandy and I after her show!
 
I learned SO MUCH from this two-day show, it was amazing.
I loved every minute of it.
 
 
They show you how to set up a good indoor shoot, they talk about lighting, white balance, running a business, advertising....you name it.
 
If it has something to do with photography -- Sandy and her team will most likely talk about it!

 
Here's a pic I took of one of the many models they provide for you to try out your skills on!
Sandy only has a few more shows lined up for the rest of this year, you can check her on at SandyPucTours. The best part is...the first night of the show is free! And the second night is only $99!

 
If you have any interest in growing your knowledge of photography - or possibly making some money doing it, make sure and check her out. I came home with over 12 pages of notes form this class! Loved it!
 
If you can't get to one of her show, you can always check her out at Sandy Puc University. She also offers a free resource at SPTV Blog 

 
I was not paid to write this review....I wasn't even asked to....I just really loved this show and would love for all you fellow budding photographers to learn from it like I did!
 
Enjoy!

I'm so happy that fall is finally here!
It really is my favorite time of the year.
 
I bought several sweaters during the spring and summer and I finally get to wear them.
I am so excited!


I went to Kohls the other day to look around
and saw this placemat
I loved the look...but it was $9
and I thought for sure, I could make one cheaper at home.
 
 
Fallen Leaf Tablescape
 
Supplies Needed:
Fake Leaves (I found mine at the Dollar Tree)
Placemat (I found this round woven one at Walmart for $2)
Glue Gun


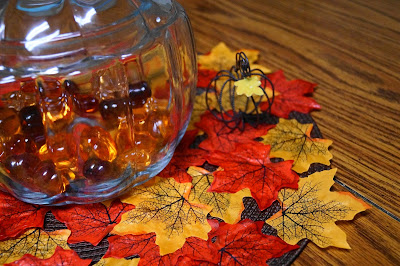
I worked around in a circle, placing the leaves here and there.
Using my glue gun as I went along.


Make sure you hang some of the leaves over the edge
and turn them different directions.
I think it gives it all a more natural look.

 
I didn't have enough leaves to cover the entire space
which I thought was just fine.

 
I really love how it turned out!
And for just $3!

 
I added my glass pumpkin
and a few other fall table items


This was an easy project that took less then about 15 minutes to finish
and it looks amazing!

 
Happy Fall - thanks so much for stopping by today!
You can find more projects like this one by clicking here.


Popular Posts

Blogger templates

Blogger news

Blogroll